For those who aren’t familiar with Angular, it is an open-source framework for web applications from Google. Armed with a bit of free time and a new idea for a website, I thought it might be fun to explore the new version of Angular (version 2) written in TypeScript.
Getting Started
Getting started with Angular seems easy enough. They even provide a straightforward ‘5-minute’ quick start guide that walks you through setting up your environment. That all works great – you can get everything running using Node and the editor of your choice.
Since everything was written in TypeScript, I really wanted to get it working inside Visual Studio. I already had experience writing large libraries in TypeScript using Visual Studio, so I decided to jump right in.
Unfortunately, trying to get Visual Studio 2013, TypeScript and Angular to play nice took a little more work than I expected – so here is my own Quick Start Guide to Angular2 in VS2013.
Using TypeScript and Angular2 in Visual Studio 2013
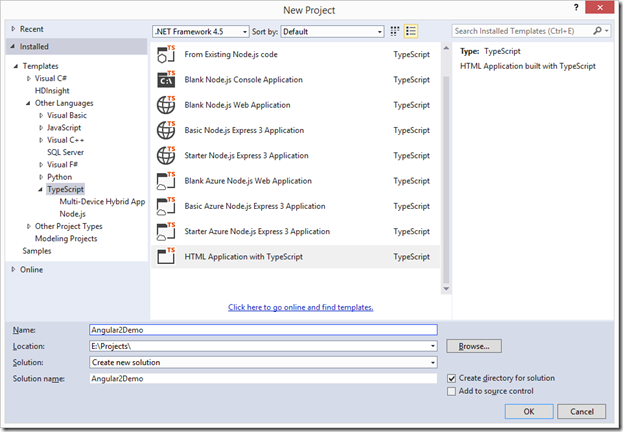
To use Visual Studio, the first thing you need is to create a project. Since we are not creating any server-side code, we will create a simple HTML Application with TypeScript:
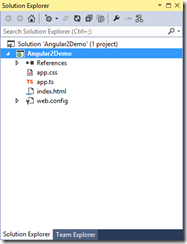
Once Visual Studio is done with its thing, you should have a new solution that looks like this:
You can go ahead and delete the app.ts and app.css files. We are going to create our own structure based on the Angular quickstart guide.
Getting Angular
First, create a file called ‘package.json’ and enter the following dependencies:
{
   "name": "angular2demo",
   "version": "1.0.0",
   "license": "ISC",
   "dependencies": {
     "angular2": "2.0.0-beta.3",
     "systemjs": "0.19.6",
     "es6-promise": "^3.0.2",
     "es6-shim": "^0.33.3",
     "reflect-metadata": "0.1.2",
     "rxjs": "5.0.0-beta.0",
     "zone.js": "0.5.11"
   },
   "devDependencies": {
     "typescript": "^1.7.5"
   }
}
Next, open a command prompt in your project directory and install the packages you referenced above.
npm install
If the install fails with errors, you may need to install the ‘tsd’ package, which you can do like this:
npm install tsd -g
This will install the package globally, but you can uninstall when you are finished re-running the original install.
Creating the App
Now that we have Angular, we are ready to create our demo app.
First, create a folder called ‘app’. Inside it, create two files: ‘app.component.ts’ and ‘main.ts’. The file ‘app.component.ts’ will import Angular and define a new tag:
import {Component} from 'angular2/core';

@Component({
     selector: 'angular2-demo',
     template: '<h1>Angular 2 Demo!</h1>'
})
export class AppComponent { }
While ‘main.ts’ will load the component:
import {bootstrap}    from 'angular2/platform/browser'
import {AppComponent} from './app.component'

bootstrap(AppComponent);
Finally, we overwrite the ‘index.html’ file with the following markup to load the scripts and display our new component:
<html>
<head>
	<title>Angular 2 Demo</title>
	<meta name="viewport" content="width=device-width, initial-scale=1">

	<!-- 1. Load libraries -->
	<!-- IE required polyfills, in this exact order -->
	<script src="node_modules/es6-shim/es6-shim.min.js"></script>
	<script src="node_modules/systemjs/dist/system-polyfills.js"></script>

	<script src="node_modules/angular2/bundles/angular2-polyfills.js"></script>
	<script src="node_modules/systemjs/dist/system.src.js"></script>
	<script src="node_modules/rxjs/bundles/Rx.js"></script>
	<script src="node_modules/angular2/bundles/angular2.dev.js"></script>

	<!-- 2. Configure SystemJS -->
	<script>
		System.config({
			packages: {
				app: {
					format: 'register',
					defaultExtension: 'js'
				}
			}
		});
		System.import('app/main').then(null, console.error.bind(console));
	</script>

</head>

<!-- 3. Display the application -->
<body>
	<angular2-demo>Loading...</angular2-demo>
</body>

</html>
Now that we have the framework set up, we are ready to make Visual Studio build and run our new application.
Building the App
If you followed along this far, you probably noticed this guide follows the Angular quick start guide almost exactly. Unfortunately, the build step is where things get a little more complicated inside Visual Studio.
To setup the build, first you need to select the Module System. Right-click on your project and select properties. Find the ‘TypeScript Build’ tab, and select ‘System’ as the Module System.
Update: If you followed this original guide you may have noticed that Visual Studio would complain about not finding the component “angular2/core”. It still built, but was annoying. Fortunately, the fix is easy. Instead of using the “System” module system, use “CommonJS” instead.
Next, manually edit the project file to include the following TypeScript directives:
<TypeScriptEmitDecoratorMetadata>true</TypeScriptEmitDecoratorMetadata>
<TypeScriptModuleResolution>Node</TypeScriptModuleResolution>
<TypeScriptExperimentalDecorators>true</TypeScriptExperimentalDecorators>
Add these lines inside the PropertyGroup element, for both the debug and release configurations.
You can now build your application from within Visual Studio!
Update 2: I accidentally added an extra ‘e’ in the Emit Decorator tag. I probably shouldn’t type these things by memory. Thankfully, an alert reader pointed it out to me, and hopefully everything should be working now!
Update 3: After a host change, a reader pointed out that the images were no longer loading, so I fixed that and some other import errors.

